Tool Windows
Version control
IntelliJ has version control support for git and others, including a tool window. For more information, see Git | IntelliJ IDEA Documentation.
Terminal
IntelliJ has an embedded terminal tool window to run command-line tasks, see Terminal | IntelliJ IDEA Documentation.
Remote libraries
Since b0.7.20
With the Library tool window (located on the right toolbar) it is possible to connect to one of the following remote libraries:
Local Zotero installation, using the Better BibTeX plugin
Local BibTeX file, for example a JabRef library
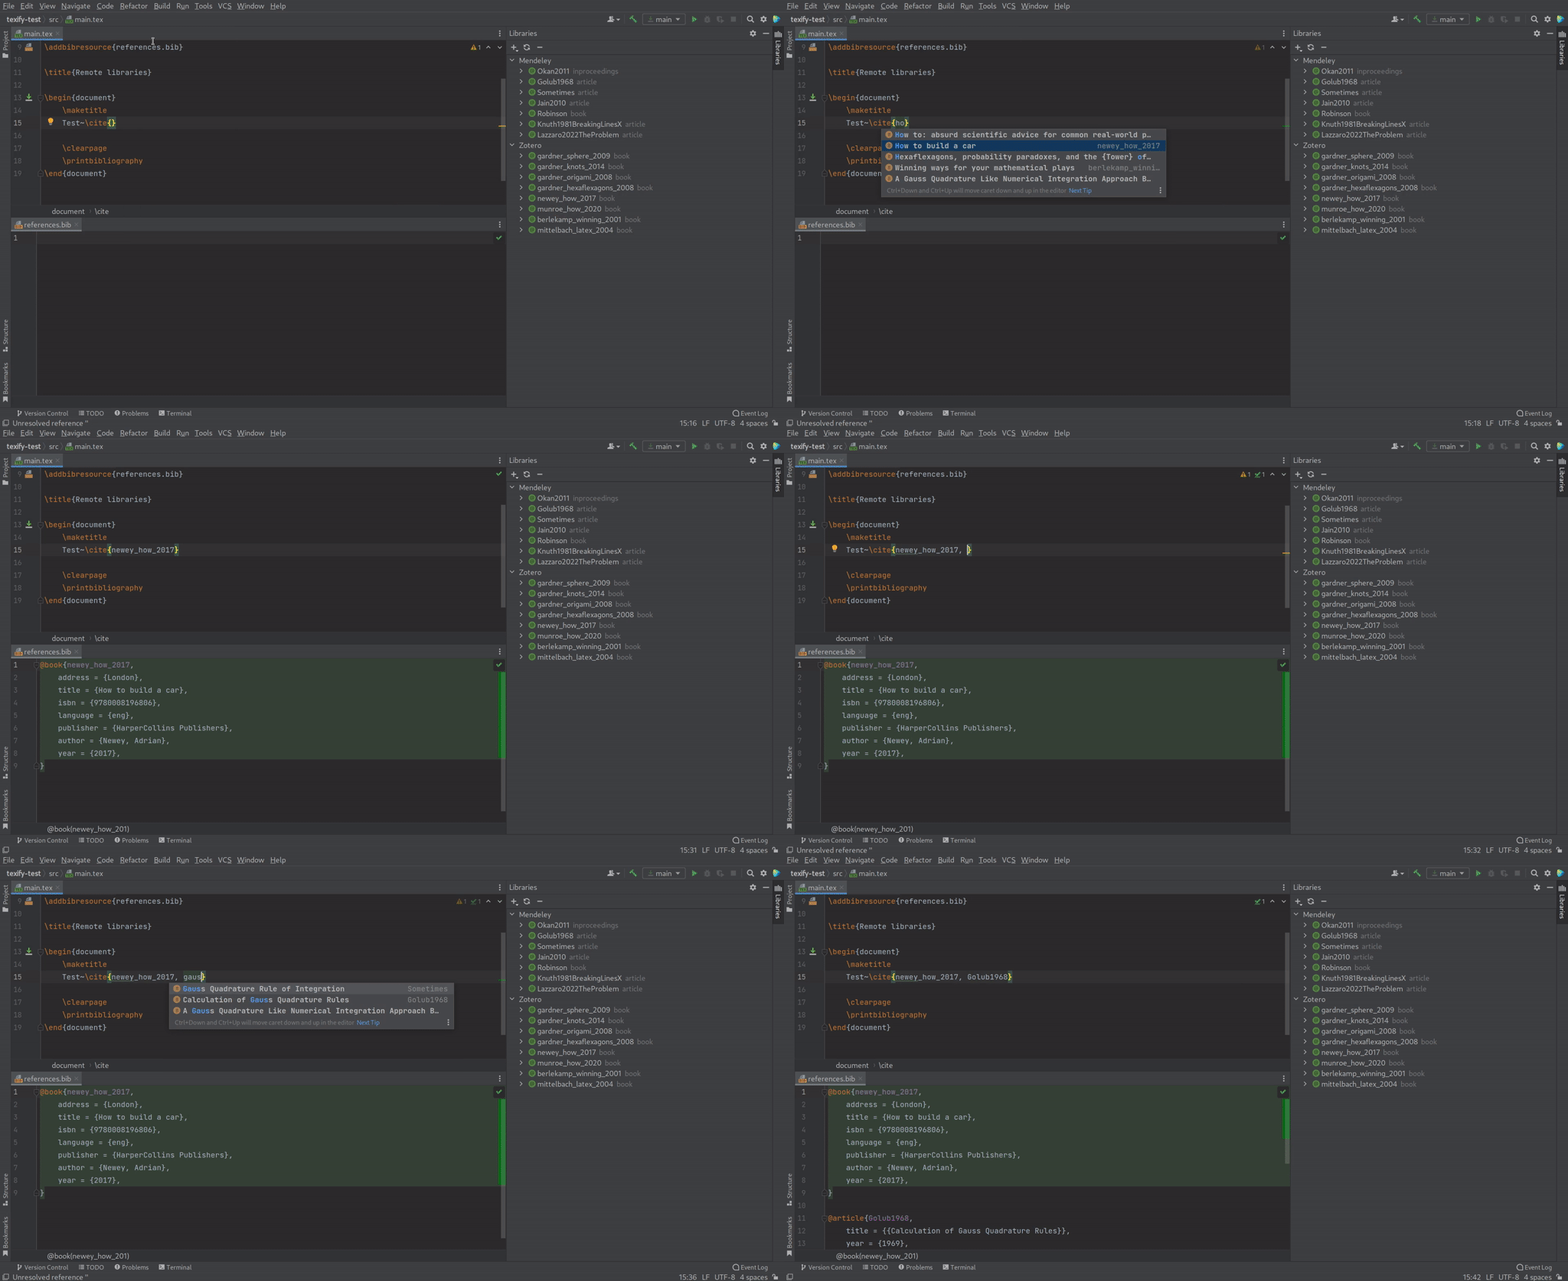
After connecting to a library the contents of this library will be shown in the tool window. The items from a remote library are available to the autocompletion of \cite-like commands the same way bibliography items that are included in a bibliography file are. When using completion on an item that is not in the local bibliography file it will be added by TeXiFy. This can be disabled in Settings. Note that there is a maximum limit of bibtex entries that will be downloaded by TeXiFy to avoid performance issues.
Completion of a bibliography item from a remote library. LaTeX file on top, BibTeX file on bottom, Libraries tool window on the right.

Connecting to a library
When connecting to a library, all items from that library will be loaded after the user finishes the setup.
Mendeley
When adding a Mendeley library you have to log in to you Mendeley account. After logging in you can close the dialog by clicking OK. Clicking cancel or closing the dialog in any other way will cancel the Mendeley setup. You will be logged in to your Mendeley account until you remove the library.
Zotero
When adding a Zotero library, you need to specify the following information that you can find in your Zotero settings:
User ID. Go to the Feeds/API tab and copy the
<user ID>where it saysYour userID for use in API calls is <user ID>.User API key. Go to the Feeds/API tab and click
Create new private key. It is important that you keep this key to yourself.
You can also change the Zotero API URL when adding a library connection, for example:
Use a local Zotero installation by installing the Better BibTeX plugin and getting the url using Pull Export. In this case the user id and api key will not be used.
Connect to a Zotero group url using the group id which can be found in the url to the group, for example
https://api.zotero.org/groups/2608283/items?format=biblatexSpecify a different format, so use
format=biblatexinstead offormat=bibtexin the url. Other formats are not supported.
Syncing a library
When an item is selected, the library where that item belongs to will be synced when pressing the sync button. When nothing is selected, all libraries will be synced one by one.
Removing a library
When an item is selected, the library where that item belongs to will be removed when pressing the delete (minus) button. When nothing is selected, all libraries will be removed.
Currently a library configuration can only be edited by removing and re-adding it.
What to do when importing the library fails
When you get a notification that the library could not be imported completely, the bib file exported by the remote library contains some element that could not be parsed by TeXiFy. You can export the bib file yourself and open it with TeXiFy to see where the parse error is. If you can reference the faulty item and compilation works fine then let us know about the parse error. When possible, edit the information in the remote library to circumvent the parse error and try again.
Detexify
Since b0.7.3
On the right toolbar, you will find the Detexify tool window. This tool window shows a browser with Detexify:
This tool window is only available in a project that contains a LaTeX module.
Please note that Detexify is not developed or maintained by TeXiFy or JetBrains, see http://detexify.kirelabs.org/classify.html for more information and resources.
Symbols
Since b0.7.3
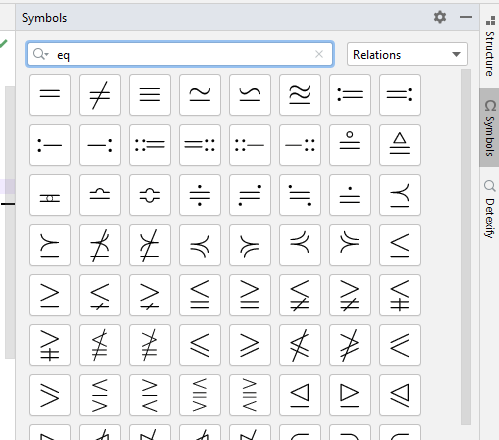
The Symbol tool window will by default anchor to the right tool window pane. Here you will find a wide range of symbols that you can insert by clicking on them. The required package will automatically be imported when clicking the symbol. The symbol gets inserted at the location of your caret in the editor. When you select a symbol like (...) or â the selected text will be surrounded properly.
The combobox allows you to limit the symbols to specific categories. You can use the search bar to search through the symbols in the selected category. You can search on generated latex/command, package name, short description and category name.
The symbol tool window supports both light and dark mode.

Equation preview
You can use the Equation Preview by making sure your cursor is in a math environment and clicking , or using Ctrl + Shift + X.
Default previewer: jlatexmath
Since version 0.7.11, if you don’t have a custom preamble we use jlatexmath (https://github.com/opencollab/jlatexmath) and it should work out of the box.
Inkscape-based preview
To use this preview, use the magic comments %! begin preamble = math and %! end preamble = math to enclose the part of your preamble that is needed for the preview, as in this example.
If you do have a custom preamble, or anything else which jlatexmath does not support, TeXiFy creates a preview by putting your equation in a new temporary (fairly minimal) document and compiling that, and then uses Inkscape to convert to an image. The current implementation of the Equation Preview was contributed by Sergei Izmailov and requires external dependencies, for which installation instructions follow. It also relies on system installed fonts, because it converts svg to image, and svg doesn’t include fonts.
Also see the option to enable continuous preview of math and TikZ environments
Installation instructions
This is only necessary if you want to use a custom preamble (using magic comments), or if you have a TeXiFy version older than 0.7.11.
Install Inkscape from [inkscape.org/release](https://inkscape.org/release).
If not using Inkscape 1.0 or later, you have to install the
pdf2svgpackage for your distro, for example on Ubuntu withsudo apt-get install pdf2svgor on Arch Linux withsudo pacman -S pdf2svg.
Install Inkscape from inkscape.org/release, suppose you install it in
C:\Program Files\Inkscape.If not using Inkscape 1.0 or later, you have to install pdf2svg from github.com/textext/pdf2svg/releases, suppose you install it in
C:\Program Files\pdf2svg.Add both
C:\Program Files\Inkscapeand (if you installed it)C:\Program Files\pdf2svgto your PATH environment variable, for example by searching for Environment Variables on your computer, clicking 'Edit the system environment variables', clicking 'Environment Variables', and under System variables find the one named Path, edit it and insert the paths here. Make sure the paths are separated by a;if using Windows 8 or lower.Log out and back in.
TikZ preview
You can use the TikZ Preview by placing your cursor in a tikzpicture environment and clicking , or using Ctrl + Shift + Y.
The TikZ Preview will take TikZ and pgf libraries into account.
The requirements are the same as for the Equation preview.
Custom preamble for equation and TikZ preview
Since b.0.6.10
To include part of your preamble in the equation/TikZ preview, enclose this part with the magic comments %! begin preamble = tikz and %! end preamble = tikz for the TikZ preview, and %! begin preamble = math and %! end preamble = math for the math preview.
To include an entire file (for example your tikzsettings.sty) in the preamble, put the magic comment %! preview preamble = tikz at the start of the file.
For example, to include your custom command \newcommand{\letters}{\alpha \beta \gamma \delta \epsilon} in the preamble of the equation preview, use
Using the preview on macOS
TeXiFy seems to have problems with running pdflatex, as commented at #25 this might have to do with PATH problems. The comment links to http://depressiverobot.com/2016/02/05/intellij-path.html which has a couple of workarounds, for example using open -a "IntelliJ IDEA CE" or open -a pycharm. There is also a more permanent workaround. If you use the Jetbrains Toolbox, you can find the path in the Toolbox under .
If you do know how we could fix this on the plugin side, please let us know.